After much procrastination I’ve made a start on replacing the bathroom door of the new house with a bifold model.
This will hopefully make entry to and exit from the bathroom a little easier (I had considered rehanging the door on the opposite side, but the position of the light switch and radiator put me off this idea).
Whilst this may sound like a simple task, it’s complicated by the fact that I’ve been unable to find a door of the correct size.
I ended up getting one from my local Focus (which gives an idea how long I’ve procastinated, as they went into administration in May 2011 and I already had the door by then!)
The door comes with a sliding rail fixture for the top of the door but I’m rather hoping I can make it work without this, as I’d like to be able to fold the door around the door frame when open to give maximum space in what is already quite a narrow door frame.
In total it is about 7cm too wide for the door frame, but the frame of the hollow core door is only about 2cm, meaning it’ll need a bit more than just a quick going over with a plane!
(There aren’t any photos of the early stages of this project as I only decided to start this blog during the later stages!)
After a bit of measuring and head scratching I laid the door out on my two folding workbenches with an offcut of carpet to protect it and began scribing a line down one edge with a marking gauge (actually my Faithful Combination Gauge) set at 3cm.
As I was worried about tear out, I then followed this line with a 2 foot steel rule clamped to the door and a Stanley knife to give a good clean edge.
The marking and scoring was repeated on the other side.
At this point I had a moment of self doubt and decided to use a fine toothed handsaw rather than my circular saw, which turned out to be a bad move, with the bottom edge of the cut wandering a few millimetres from square, however the 5mm in hand and the fact that I’d not yet cut the other side saved my bacon here!
I was left with the side frame of the door with both skins and offcuts of top, middle and bottom cross members still attached, so I used an old chisel to prise the side frame free for reuse.
Quite a lot of the hardboard skin of the door remained, so I used a hand plane to get rid of this and prepare the surface for gluing.
At this point I decided that cutting the top, middle and bottom cross members to allow the reinsertion of the entire side frame was going to be too fiddly, as the only methods I could think of were by hand with a chisel (which would probably break a lot of the glue holding the skin on) or freehand with a router on the edge of the door.
I suppose I could have clamped some wood either side of the door to at least give a more stable base for the router, but after previous experience making some tongue and grooved floorboards to replace some a plumber butchered I decided against that option.
I therefore cut the frame down so it fit between the top & middle and middle and bottom rails, checked it for fit and began thinking about how to glue it.
Firstly I decided to use my waterproof PVA, as being a bathroom door I didn’t want my handywork coming apart at the first splash of water!
I assembled my entire collection of cramps (4 x G cramp, 4 x cheap quick clamps and 6 x spring clamps, 2 of which were too small to fit the door) and then spent ages trying to unblock the nozzles of my supposedly unblockable nozzled glue bottles and started spreading the glue on the inside faces of the upper section of the door frame, above the middle crossmember.
With this done I clamped the side frame in place and retired to the lounge to warm up a bit.
After waiting for the glue to set for a while I went out and repeated the process for the lower section of the door, however to facilitate this I needed to move half the cramps from the upper section (this proved to be a mistake, as both sections are not as tightly jointed as they could have been 😦 )
The next day once the glue had set I removed the clamps and began work on tidying up the mess left by my wayward hand saw.
I found that clamping a couple of offcuts of 2″ x 2″ in the hinged section of the door allowed me to stand it on the uncut section with the cut and glued side of the door up on edge and this made for very easy planing. The photo below is actually of the second side but should illustrate the point

I then gave my new Axminster EHP82 power planer (bought in their clearance sale for a bargain £20, but no longer listed on their webiste) its first outing!
I quickly found that the depth setting was a little on the conservative side (better too little than too much when removing material though) and discovered that a setting of 1mm took a decent amount off without tearing or taking too much off.
I quickly squared up the edge of the door, removing around 4-5mm in total. Removing this amount of wood meant that the wavering cut on one face of the door is no longer an issue, as it’s been flattened out and the other face planed down to match it.

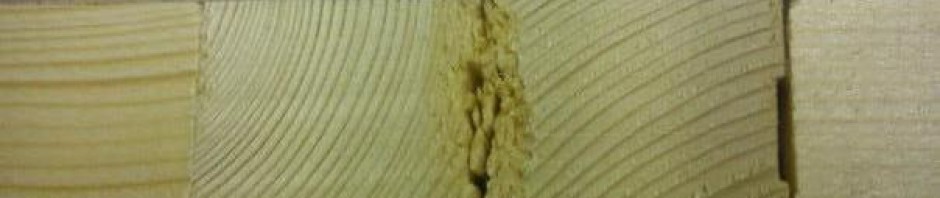
Unfortunately the middle cross member of the door is made up of two 2cm square timbers, which weren’t tightly fitted to each other, so there’s a fair bit of tear out to both. I’ll have to try and pack something between them when I come to plane the other side …

As the glue was not as tidy as I would have liked I have designated this the latch side, as I suspect it’s not up to being the hinge side. I’ll hopefully be able to tidy up the torn middle cross members with some filler and paint …
I repeated the scribing and scoring process for the other edge of the door, but decided to use my Bosch PKS46 circular saw with an 18 toothed to try and better align the cut in the two faces of the door.
This went a lot better than expected (although the base plate of the saw left a few light scratches on the door) and I proceeded to cut the side frame to fit around the cross members and coat the inside of the door skin with glue.
This time I decided to clamp some planed timber either side of the door to spread the pressure from the cramps and enable me to glue both sections at once.

This seems to have made a much tidier job of it and I’m hopeful that this will also have an effect on the structural integrity of the glued joints, meaning this edge is up to the task of being the hinge side.
I’m unlikely to get much time this week to work on this, so I’ll leave it here for now.
Part 2 will take up the tale from the planing of the second edge and (hopefully! 🙂 ) conclude with the hanging of the door.

Pingback: Various odd jobs | Aggravated Wood Butchery